A safe and reliable Internet visibility depends on the ability to shield any web applications from malicious traffic or intrusion attempts. One of the main advantages of using WAF by Cloudflare is that it comes with Managed Rules for protecting your web applications. In this article, I’ll break down Cloudflare’s Managed Rules and discuss every single detail.
What are Managed Rules?
Managed Rules are predefined rulesets that help you protect your web applications from common threats, such as SQL injection, cross-site scripting (XSS), and other security vulnerabilities. Cloudflare offers a range of Managed Rulesets to address various security concerns, which can be easily applied to your WAF configuration. WAF Managed Rules allow you to deploy pre-configured managed rulesets that provide immediate protection against:
Zero-day vulnerabilities
Top-10 attack techniques
Use of stolen/exposed credentials
Extraction of sensitive data
Key Benefits
- Effective Protection: Moreover, with Managed Rules you can build strong barriers that prevent both well-known and newly appearing dangers from being successful, so you don’t need to create unique rules for every application.
Easy Deployment: With a user-friendly dashboard by Cloudflare, you can apply, customize as well as manage managed rules on your web application.
Continuous Updates: To cater for fresh threats and vulnerabilities, Cloudflare continuously updates its managed rules to keep your application secure.
Customization: On the positive side, Managed Rules deliver a complete security solution that is scalable as it adapts itself well to particular customer’s application preferences.
Diverse Rulesets: Cloudflare provides with its Managed Rulesets several options to address various vulnerabilities in order to be able to create a personalized protection for your application.

Certainly, let’s dive into each point mentioned in Cloudflare’s documentation about Managed Rules for Web Application Firewall (WAF) in detail.
Managed Rulesets
Cloudflare provides a range of Managed Rulesets, each designed to address particular security concerns. Some of the notable Managed Rulesets include:
- OWASP Core Ruleset: This ruleset is based on the Open Web Application Security Project’s recommendations and helps protect against common web application vulnerabilities such as SQL injection, XSS, and more.
- Cloudflare Specials Ruleset: This ruleset addresses specific Cloudflare-related threats, such as bypassing security checks or exploiting Cloudflare features. It ensures that Cloudflare’s own infrastructure is secure.
- WordPress Ruleset: Tailored for WordPress websites, this ruleset offers protection against common WordPress-related vulnerabilities and attacks.
- Magento Ruleset: Similarly, the Magento Ruleset focuses on protecting Magento-based e-commerce websites from known threats.
- Bot Fight Mode: This ruleset is designed to identify and block malicious bot traffic, helping to prevent web scraping, brute force attacks, and other automated threats.
Rule Customization
While Managed Rules provide excellent out-of-the-box protection, Cloudflare also offers the ability to customize these rules. You can adjust the severity of rules, whitelist or blacklist specific IP addresses or user agents, and even create custom firewall rules to complement the Managed Rules.
Deploy Types
When it comes to deploying Managed Rules with Cloudflare’s WAF, you have several options to choose from:
- Fast and Secure: This is the default deployment type, and it is designed to provide immediate security benefits with minimal configuration. It’s a quick way to enable Managed Rules for your web application without much manual intervention.
- Sensational: The Sensational deployment type is recommended for advanced users who want fine-grained control over their WAF rules. It allows you to selectively enable specific Managed Rulesets based on your application’s needs. This approach is more hands-on and requires a good understanding of web application security.
- High-Security: This deployment type focuses on a higher level of security and is suitable for applications with stringent security requirements. It enables a comprehensive set of Managed Rules to provide robust protection against various types of attacks.
- Paranoid: The Paranoid deployment type is the most stringent and is designed for applications that are under constant, high-level security threats. It enforces the strictest security posture with an even more extensive set of Managed Rules.
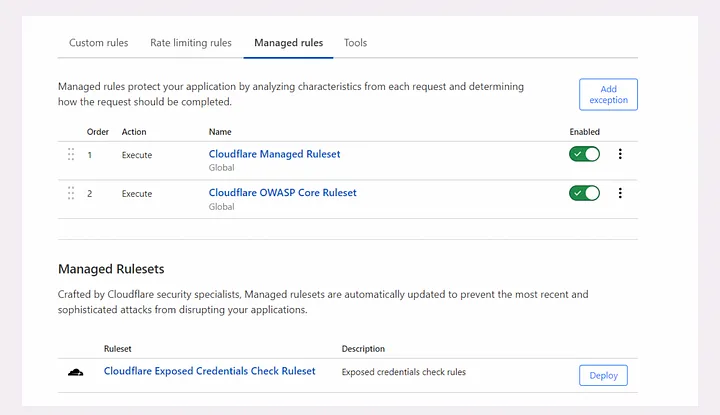
Selecting the appropriate deployment type depends on your application’s specific security needs and your familiarity with web security configurations. You can deploy and configure managed rulesets for a zone in Security > WAF > Managed rules.
Deploy and configure managed rulesets for a zone in Security > WAF > Managed rules.

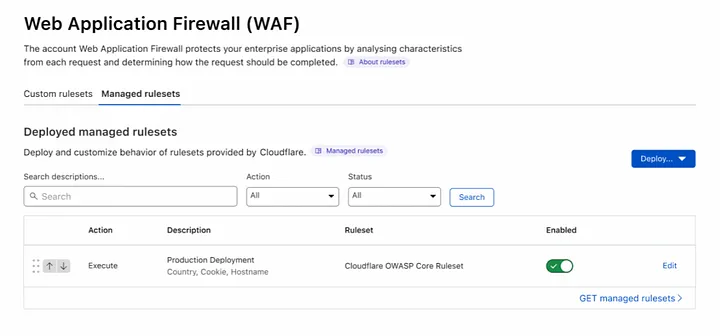
You can enable and configure managed rulesets for an account in Account Home > WAF > Managed rulesets.

Deploy a managed ruleset in your account or zone using Rulesets API.
To the http_request_firewall_managed phase deploy WAF managed rulesets. The other managed rule sets, such as DDoS Attack Protection managed rule sets should be deployed at another phase. Details are provided in specialized managed ruleset documentation.
The IDs of the various WAF managed rulesets are found in the WAF Managed Rules page. When deploying rule sets using APIs, you will need to have information about this.
To deploy a managed ruleset using the API, refer to Deploy a managed ruleset.
Ruleset Reference
Cloudflare provides several Managed Rulesets, and each is tailored to address specific security concerns. It’s essential to understand these rulesets and how they can benefit your application:
- OWASP Core Ruleset: This ruleset, based on the Open Web Application Security Project (OWASP) recommendations, is a fundamental security layer. It protects against common web application vulnerabilities such as SQL injection, cross-site scripting (XSS), and more.
- Cloudflare Specials Ruleset: This ruleset is tailored for threats specific to Cloudflare’s infrastructure. It ensures that Cloudflare’s services remain secure and that attackers cannot exploit Cloudflare features.
- WordPress Ruleset: Designed for WordPress websites, this ruleset provides protection against common WordPress-related vulnerabilities and attacks. It’s particularly useful for WordPress site owners.
- Magento Ruleset: The Magento Ruleset focuses on safeguarding Magento-based e-commerce websites from known threats. It’s crucial for online store owners using the Magento platform.
- Bot Fight Mode: This ruleset is used to identify and block malicious bot traffic. It’s essential for preventing web scraping, brute force attacks, and other automated threats. It helps to maintain the integrity of your site’s data and resources.
Understanding these rulesets allows you to select the ones that best fit your application’s needs and vulnerabilities.
Create WAF Exceptions
While Managed Rules provide robust security, there may be situations where certain requests or behaviors are mistakenly flagged as malicious. In such cases, you can create exceptions or bypass rules for specific requests or IP addresses. Here’s how you can create WAF exceptions:
- Rate Limiting: You can set exceptions for specific IP addresses or client identification information (e.g., cookies) to avoid being rate-limited.
- Rule-Level Bypass: On a per-rule basis, you can define exceptions for requests that trigger specific rules. This can help in handling false positives, discussed later.
- IP Firewall: If you have specific IP addresses or ranges that need to bypass the WAF entirely, you can create IP Firewall rules to allow or block traffic as needed.
Creating exceptions allows you to balance security and accessibility, ensuring that legitimate requests are not unnecessarily blocked.
Log the Payload of Matched Rules
To investigate and analyze potential security threats and false positives, you may want to log the payloads of matched rules. This means recording the content of the requests that triggered WAF rules. Here’s how you can set up payload logging:
- Firewall Events: In your Cloudflare dashboard, you can enable Firewall Events to log the payloads of requests that trigger specific WAF rules. This helps you gain insights into the nature of the requests that are being blocked.
Payload logging is particularly useful when you need to understand the exact nature of attacks and adjust your security configurations accordingly.
Command Line Operations
Cloudflare also provides a command-line tool called cloudflared to facilitate various WAF operations. This tool is especially helpful for managing Cloudflare services directly from the command line. Some of the operations you can perform include:
- Manage Tunnel Configuration: You can use cloudflared to configure and manage tunnels, which are used to connect your server to Cloudflare.
- Manage Access Control Policies: With cloudflared, you can configure and manage access control policies, ensuring that only authorized users or entities can access your web application.
- Access WAF Logs: The tool allows you to access logs and analytics data related to your WAF settings and security events.
Using cloudflared offers a more flexible and programmatic way to interact with Cloudflare’s WAF and related services.
Handle False Positives
False positives occur when legitimate traffic is incorrectly flagged as malicious by the WAF rules. Handling false positives is crucial to maintain the accessibility of your web application. Here’s how to deal with them:
- Rule-Level Bypass: As indicated at the beginning, exceptions may be made on a rule by rule approach. For any specific rules that give a lot of false positives, these can be skipped knowing that there is clean traffic for them.
- Monitoring and Adjustment: Check Your WAF Logs And Adjust Your Rule Configurations Regularly. Depending on pattern observation of false positives, it is possible to fine tune rules settings, adjust severity level, or generate exemptions when necessary.
- Anomaly Detection: Cloudflare provides tools for anomaly detection, which can help you identify unusual or unexpected patterns in your traffic. This can be useful for detecting and addressing false positives.
Finally, Managed Rules by Cloudflare are a great option for protecting your web applications. This will enable you gain knowledge in the various deployment types, rulesets, customization options, exception handling, payload logging, as well as command line operations that may help you configure your WAF for maximum protection and at the same time retain usability. It’s important to note that Web Application Firewall is not a one-time measure and the security of your applications should be constantly reviewed.
Reference link to know more in detail: https://developers.cloudflare.com/waf/managed-rules/
Thanks for reading! I hope you found this blog informative and insightful. For more technology-related content, don’t forget to follow us on LinkedIn.
